Great!
attiny85 is cute but I think 84 is much more interesting due to extra pins and cheaper price.
any more details on your implementation ? chance to share code / hw design?
Great!
attiny85 is cute but I think 84 is much more interesting due to extra pins and cheaper price.
any more details on your implementation ? chance to share code / hw design?
Extra pins is indeed the reason I choose this microprocessor and my experience with it of course. I will share my implementation and detail in a Blog I’m starting. I will announce the site here in a few weeks.
great
Due to the positive response I made a new blog in the past week and here is the link to the ATtiny84 low power node:
http://www.iot-lab.org/blog/101/
Have fun!
Good work, I can run on 923MHz now ^^.
before can’t run because I set internal clock 1MHz @_@!.
How I can change connect MOSI–MOSI (PB0),
this point is another waste my time for debug it.
Thank You.
I am having good results testing using an ATtiny85 as a sleep supervisor as it idles at less than 1uA waiting for a hardware interrupt. I have little programming experience however and have trouble making SoftwareSerial library work with the sleep library, anybody try this?
I would like detect an event and then drive a high-side switch using the ATtiny upon wake-up from deep sleep, write the packet counter to a totally powered down (ABP) LoRaWAN node. A serial message would be ideal but I guess I could tap it out in morse! A simple digital indication from the LoRaWAN node after transmit could sleep the node again.
Ideas?
Hi Leo,
great blogpost thank you.
a question

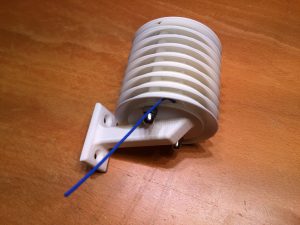
were did you bought this enclosure ?
I did not bought it. I designed and printed it myself (3D print). You only have to add 2x M4 x 60mm bolts and 2x M4 nuts.
I made the design public available: http://a360.co/2FBE9M9. You have to print the mid-section a few (8) times.
I learned that it is called Stevenson screen. My design has the looks but not the scientific usability 
aha… another reason to buy / build a 3d printer ![]()
I put your link in the new 3D printer topic tnx
nice ATtiny expi board 
Greetings! Question on the initial ATtiny85 + RFM95 sensor. I’m trying to recreate the assembly and noticed the wiring has the ATtiny PB1 (which is normally designated for MISO) connected to the MOSI terminal of the RFM95. Is that correct? Yes I’m new to this but did a separate LoRa project and it had MOSI from an Ardunio Uno connected to the MOSI terminal of the RFM95.
Appreciate any guidance.
You need the MISO pin for uploading the program to the ATtiny.
If you use SPI in this case USI you need the DI and DO pinout.
MISO and DO share the same pin PB1.

Thanks! I’ll give it a try tonight and see if I can get the program to work.
Well go figure. That worked by switching the MOSI/DI and MISO/DO connections. Thanks!
Will this also be possible with an ATTiny44 instead of the x85?
Hi Leo. I like your lora node with the ATTiny84a. It works well. I am trying to get just pressure and voltage (and maybe temp). Despite cutting out the random three frequencies, I am still 32 bytes over! Do you know how I can swap humidity for pressure?? It seems to do a lot of calculations for pressure - but my programming is not up to it.
To save a lot of calcs in the Tiny xfer the data then scale it in the cloud or in the end report.
Thank you Jeff. That is exactly what I did in the end. I message Leo on his project page and he kindly rewrote the code to simply send the register data. Then it only uses about 60% of capacity. I was trying to work out height accurately using https://keisan.casio.com/exec/system/1224579725
In the end I had one node, at a known height with outside temperature, sending data and the other sending the pressure data to work out height from. Accuracy with a 99p Chinese BMP280 is approx ± one metre, except when the wind blows a lot when error doubles. Still ok. I searched five sites before finding Tago.io which does nice calculations with two nodes. My node.js script is the world’s worst script but it works.
some more ATtiny links for your collection  :
: