Modifications needed for external antenna on the Things Uno

I was wondering what kind of modifications I need to make to use an external antenna with the Things Uno.

I’d like to try to put an external antenna on this board, specifically this one


(which I’m using with an RFM95 already)

So I’ve soldered on an SMA connector already.
I guess I need to either bridge the antenna trace to the connector center pin, or bridge it with an SMD capacitor like 10 pF. The on-board chip antenna is currently still connected to the trace.

Do I need to cut the trace to the chip antenna?
Or can I just leave it on (so it sits parallel to the external antenna)?
Is there a recommended procedure for using an external antenna?

The documentation linked in https://www.thethingsnetwork.org/forum/t/schematic-things-uno/3020/3 shows what to do for an external antenna.

I also want to make use of an external antenna with The Things Uno. However, I have a newer version of the Uno (see here: : https://shop.thethingsnetwork.com/index.php/product/the-things-uno/) with a different lay-out . Has anyone tried to connect to an external antenna to the newest version of the Uno? If so, do you have a tutorial/schematic for me, so I can do it myself?

1 Like

I am facing the same issue. My model reads TTN-003-868-1.0
The description of the device in the shop states:

Includes connections for an optional external antenna on the breakout circuit to maximize the range.

So I was expecting this to be self explaining.

After a month I still have not found a scheme/tutorial. Is there someone who can help me/us out?

The type you mention was delivered for the Kick starter.
At the top end of the RN2483 you find J1 and R18. As stated in the printed text you can solder here a u.FL connector. You have to remove R18 to disconnect the onboard antenna. (I shifted the 0 ohm resistor not to loos it so i can revert the modification)
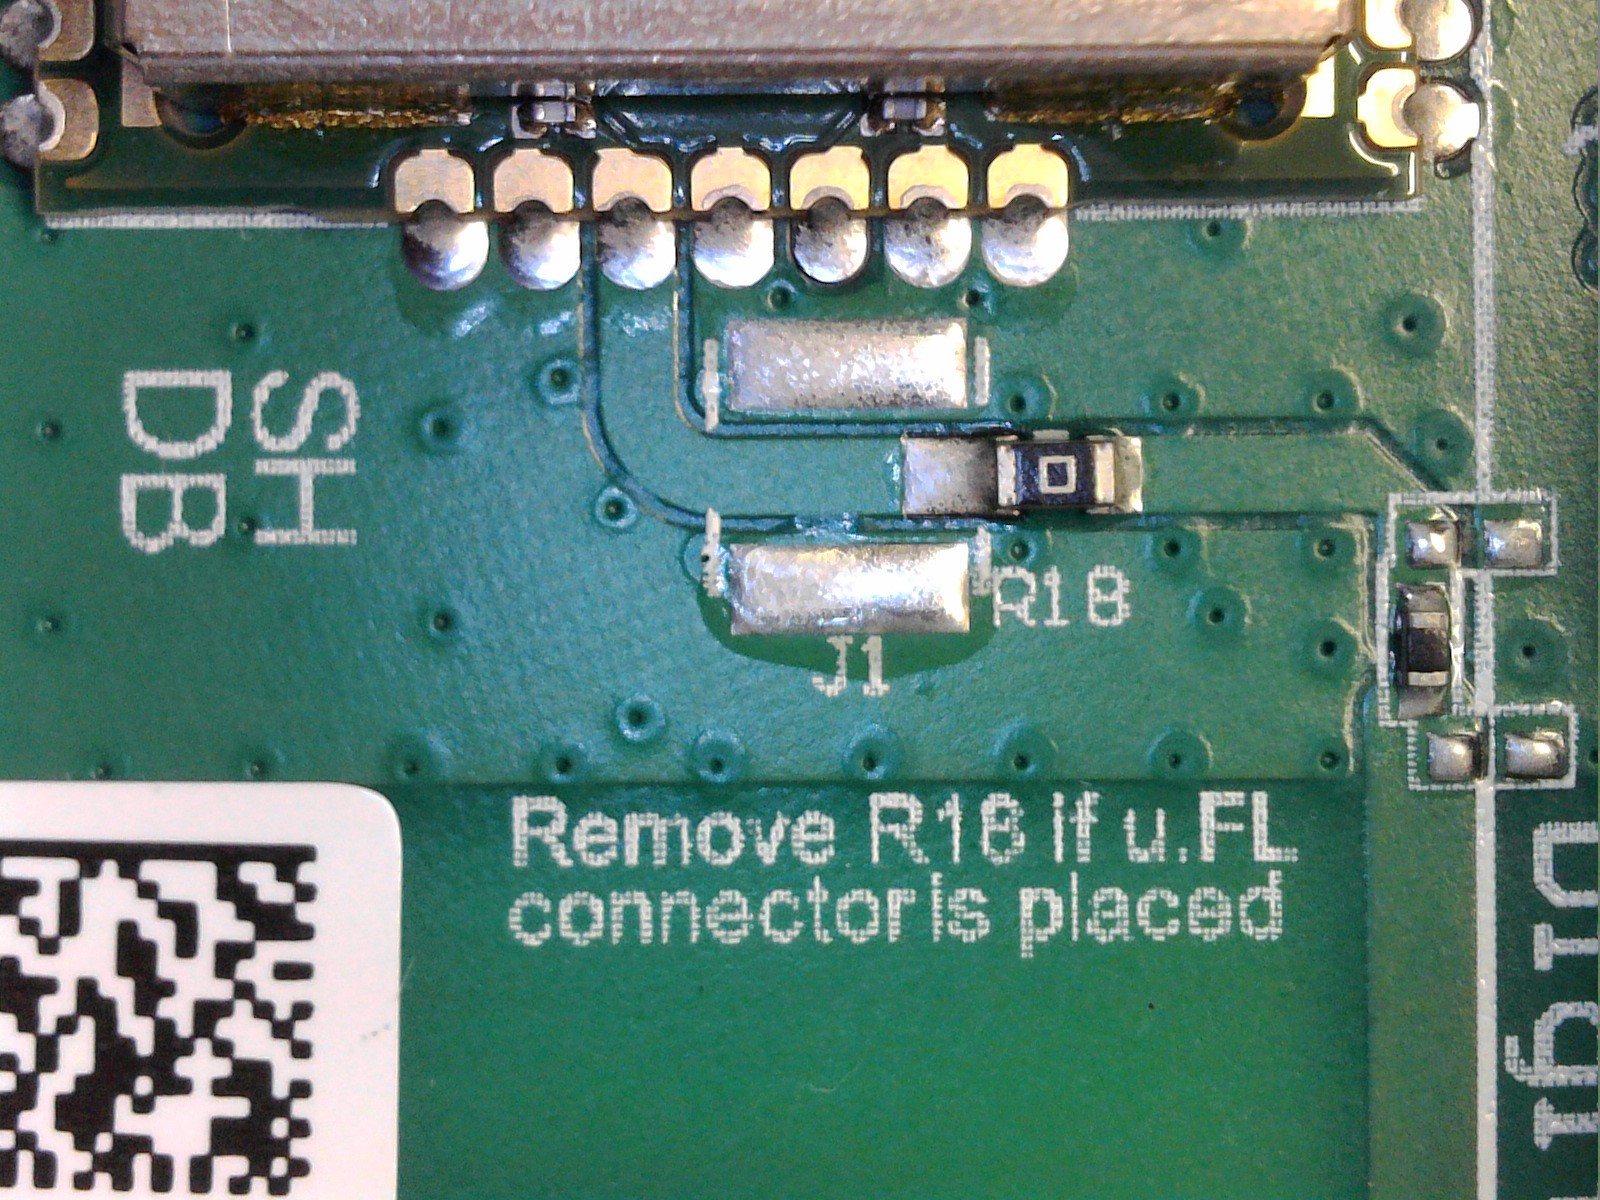
WIN_20180102_09_08_40_Pro

3 Likes

Thanks for the swift reply! I still have two questions:

  • Do you also have a picture of your board including the u.FL connector?
  • How can we remove R18? (Or how do we shift it?) We don’t have a lot of experience with adjusting these kind of boards?

Unfortionately for you: No. The modified node is in the field.

SMD is not difficult. You only need to dare. This film shows how to (re)move the resistor: https://www.youtube.com/watch?v=8JM4oCpWnjU
It is also useful for placing the uFL.

1 Like

Thank you very much! Hopefully we are able to attach the external antenna.

20180223_114456
I connected the antenna as shown in the picture, is that correct?
At the end of the wires is the SMA connector.
The middle outlet (on which the R18 was connected) to the middle pin of the SMA connector
and the J1 outlet on the SMA shielding.

Think looks good… but be very carefull not to put force on the thick wire because it could rip the pcb trace from the board.
better to glue the cable to the board also

1 Like

Hi. Just bought a nice antenna with a 5cm long very thin shielded cable that ends in a female ufl connector. I suppose I could cut the wire and try to solder like in the picture but would rather have a nice snap-in connection. Can I send mu Uno to someone that could prefessionally solder on a ufl mail connector to the board. The damn thing must be less than 3mm x 3mm!! I couldn’t even remove a male conne tor fron an old laptop wifi module without ruining it. Too damn small for a classic soldering iron. Suggestions?
CurtisIMG-20180227-WA0013

I’m sure you can find TTN’ers in Paris… or take your uno to a mobile repair shop

Hi I have been wondering about the same kind of things, do you know why the R18 needs to be removed? Is it because it would override the U.fl connected antenna with the existing internal antenna?

20180515_115609

Just to be clear, the part which needs to be removed is the silver square above the number 8 of the R18 letter/numbering ?

R18 needs to be removed because you would otherwise have two antenna’s in parallel (which is not good).

There usually is a (black) 0 ohm resistor placed between the two solder pads (‘silver square’), the one above ‘R’ and the one above ‘8’ (above ‘R18’) but on your photo the resistor seems not to be there (anymore).

Did you solder the I.PEX/U.Fl connector yourself and maybe accidentally remove the resistor (or did your Things Uno have the connector in place already)?

Thanks, it was like this already, do I need to remove anything or should it be ok to connect the external antenna and good to go?
I am currently having trouble connecting to the things network so was thinking maybe I did not connect the external antenna correctly.

Join not accepted : denied
Check your keys, coverage and Backend status
Then
Response is not OK: no_free_ch
Send join command failed

If it was like that already then the resistor has been removed already (or was never there).
Did you get it like this from The Things Network or has someone else modified the board?
In latter case a possibility could be that the connector is not mounted correctly onto the board, but your issue may also be software related (which is more often the case).

I have little experience with Things Uno / RN2483 so others can probably better assist you with the issue.

x827

this is the UNO in original state.
you see the zero ohm resistor (r18) connecting the on board antenna, so if that’s removed and the ufl connector soldered on you’re good to go… but never NEVER power on the uno now without antenna connected after this modification !

ok what would happen